ROS Basics – Topic: Mixing Publisher and Subscriber for a Single Node
In previous examples , we have created publisher and subscriber objects in separate files. However, it is possible for a node to subscribe and publish at the same time. Which means that nodes can have multiple publications and subscriptions. Sometimes in ROS, nodes transform the data. For this they receive the message from one topic, perform computations, and publish the message on the other topic.
Now we will create a node (a python file) which is doing both subscribing and publishing the message.
For this we will create “square.py” file in “src” folder of already created package “ros_basics”
Open a terminal and run the command
roscore
Open another terminal and run
roscd ros_baics/src
Run the command to create a new file “square.py”
touch square.py
Give execute permission
chmod +x square.py
Open the file to modify it
gedit square.py
Copy and paste following code into the file
#!/usr/bin/env python
import rospy
from std_msgs.msg import Int32

rospy.init_node('square')

def callback(msg):
        squared = Int32()
        squared.data = msg.data * msg.data

        pub.publish(squared)

sub = rospy.Subscriber('number', Int32, callback)
pub = rospy.Publisher('square', Int32)

rospy.spin()
The above executed commands are shown in figure below

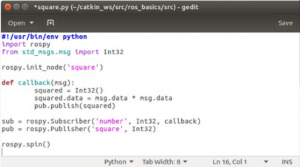
The file will look like this

In this code, we are creating a ROS node named “square”. The node has both subscriber object “sub” and publisher object “pub” as can be seen in the code.
When the node receives the message the function “callback” is called. An object of type “Int32” named squared is created.
Then we take square of the received number (by multiplying msg.data with itself) and assigned the result to squared.data variable.
Then the results (square of the received integer) is published to the topic “square” using “pub” object (as pub.publish(square)].
In this code, we can see that the node is doing both subscribing and publishing the data.
Now we execute the file “square.py”
Run the command
rosrun ros_basics square.py

Note: You can see that there is a Syntax Warning to include “queue_size” argument in the line “pub = rospy.Publisher(‘square’, Int32)”. This is not very important at this stage, however you can add the argument to avoid this warning. The line will be modified as “pub = rospy.Publisher(‘square’, Int32, queue_size=1)”. This argument save the number of messages (equal to queue_size) in queue to publish. In case queue_size is equal to 1. It keeps only the latest message in the queue.
Now, we can verify which topics are running
Run the command
rostopic list
As shown in figure below, the topics “/number” and “square” are also running

Now we run “rostopic echo” command to see what value is received on the topic “square”
Run the command in new terminal
rostopic echo square
You will see that no value is being displayed. It is because no one is publishing on the topic “number”, which means that node is not receiving any data to square and to publish it.
Therefore, we run the command “rostopic pub” to publish on the topic “mumber”
Run in a new terminal
rostopic pub number std_msgs/Int32 5
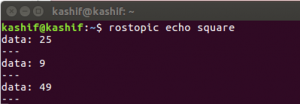
You will see that square of the “5” is received on the terminal window where “rostopic echo” command is running.

You can publish values on topic “number” multiple times as shown in figure below

While running the command “rostopic pub” you can write
rostopic pub number std_msgs/Int32 Tab Tab
you can press tab twice as shown in above line, this way the variables inside the message will appear automatically. You can fill the value of the variable. As in above case the variable “data: 0” was displayed. We modify the value “data: 0” to “data: 7”. This way you do not need to remember the variable names inside the message.
Congratulations! You have covered the “topics” in ROS. Most of the work in ROS can be done using topics. In some cases you will need other communication methods such as service and action. In next section we will cover the second main communication mechanism in ROS called service.

